Can I just say something?
Concept artists are insane. In the best way possible.
I've always deeply admired concept artists for videos games & film. While growing up with a heavy sci-fi & entertainment influence, I always wanted to tell my own stories though concept pieces.
In the last couple of years of getting the hang of ProCreate for the iPad Pro, I worked on making my own digital pieces just for fun. While I've only made a few, it's awesome to see my own thought process and progress over time. Here are the past pieces I've made, in order from first to last:
Over time I truly earned through trial and error. I noted what methods worked best for me, despite watching a ton of concept artists and their workflow. Every artist is different. I typically like starting with shadows & highlights.
So far I've been painting mine in a profile view to start, so I can eventually transition into painting other perspectives & 3D models of them.
Program: you do not need to have ProCreate/an iPad to make these – I started in Photoshop w/ a Wacom Tablet. There's a ton of digital painting programs you could certainly use for this kind of thing.
Brushes I use: certain brushes for certain phases of painting. Overall, I like to keep a limited group for consistent look across these weapon pieces. But these are most of my favorites (in ProCreate):

This is my typical workflow, broken down in some steps. Take some time to experiment and see what works for you!
P.S. This one took me about 7 hours of total sketching & painting time! :)
1. Research & gathering source material
Before doing absolutely anything, there is the ever so important research & development step. I always like to think not so much about the weapon itself, but more about the character and the environment they would need this kind of weapon in. What kind of conditions is this character living/traveling through? Does this weapon benefit off of the land or environment? Is this something they've had for a very long time, or is this a new state-of-the-art weapon straight from the market? What kind of enemies are they fighting? Do they carry it on their backs, in a holster, etc?
For this specific example, I'm going with a Dune-villain-inspired, post-apocalyptic desert wasteland aesthetic. This is the time to think about things like what the owner of the weapon might look like, what they're wearing, what kind of conditions the weapon might be used in, what materials the weapon is made of, special features it possesses, color palette, etc.
2. Quick thumbnails – get the idea of form & materials.
I like to roughly sketch out a few ideas that come straight to mind. You'll come to find pretty quickly what kind of features you want to definitely have, and which ones can be left out. For example, I'm really leaning towards including some kind of volcanic/rock-terrain-inspired material, as well as some kind of obvious energy source that will ignite the weapon from within (most likely a type of rare crystal/geode.)
This is the time to understand the general size, weight, and complexity of the weapon for your fictional character. Understand why they would be using this, who might've made it previously, etc. It's great to ultimately create a fiction around your piece to create a more immersive & believable weapon.
And while I don't formally know a lot about weapon design and the technical aspects that should be obviously implemented in each piece, these truly are just for fun and I'm working to be adding more technical detail that could help a game developer/modeler.
Parts to probably include:
Some kind of handle/place for the character to hold/grip the weapon
A trigger of some sort
An exit for the fired shot
Just have fun with it! Sky's the limit – you'll end up making more decisions & adding/cutting things out in your piece later on anyway.

I'm going to go with my #4 thumbnail :)
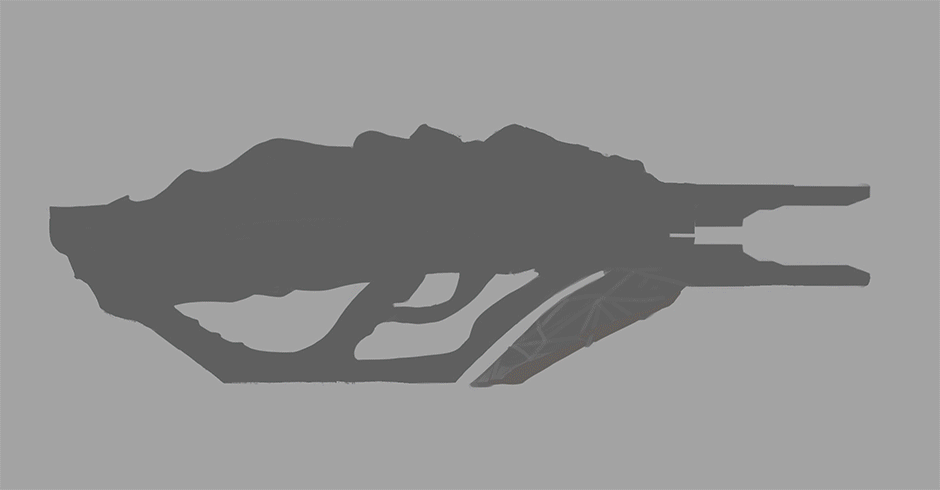
3. Block out the weapon silhouette in grey
This is to refine the shape and get proportions figured out (ie the handle, magazine, scope, trigger, etc.) while mentally mapping out what details go where.
It's typically best to have a silhouette that has some of the basic principles of design like balance & contrast. Give yourself interesting shapes that can stem off of the main body of the weapon to explore special features that aren't always typical (like a scope, keychain, spikes, etc.)

4. Draw out details in thin black line work
This is where I usually like to really dive into the first step of details. Ideally this is the "floor plan" of the weapon's personality, features & bad-assedness. For this specific example, I'm figuring out how the handle and trigger will lie together, as well as creating a symmetrical look for the "blaster"/exit part of the gun. I'm also taking into consideration what materials will go where, and slowly starting to show those forms and shapes.
Depending on the color palette & lighting, I typically erase some of it over time – (like where the geode/crystal parts will be.)

5. Shadows & midtones, layers of color
I always start this part by making a "sun" somewhere on the canvas to mentally take note of which direction the light source will be coming from. I'm creating shadows & dark areas, emphasizing depth & what part stick in or out of the weapon. While I'm not a professional in hard surface materials and surface lighting, educated guesses and lots of references are my very best friend. That's why eventually doing these in 3D with lighting setups will be a great learning curve in understanding how materials and environments interact with each other.

6. Create some rough highlights for reference
Usually highlights are more for the end – but I love to see some in the middle of painting just to get a sneak peek of it coming to life, and see if they're working or not.

7. Textures & more blend modes
Start to implement your color palette – When overlapping color & getting tints & tones of your palette, BLEND MODES ARE YOUR FRIEND! Multiply, Screen, Add, Color Dodge and Color Overlay are ones I lean on a lot. But honestly, I always scroll through and just apply what I'm looking for.
A side note on this piece – I intentionally wanted to challenge myself with the materials on this one. I've never created refracted materials (like crystals/glass) as well as rock/terrain before. I think this piece has motivated me to eventually do some material & lighting studies to help understand those things a little better. Look at that, more learning!
8. Highlights, glimmers & glows
This is my absolute favorite part. The spots where the weapon really shines (literally) add great dimension & contrast. They help give just a little more realness to the whole kit & kaboodle.

9. Add a textured background that suits your weapon's vibe
Grey is cool. But I love to add a custom textured background that gives the weapon some kind of environmental context as a little "bow" to wrap it all up in. Here's a desert-rock-like background (also made from ProCreate brushes):

10. Post that sh!t out
Absofreakinlutely spam everyone & every platform with what you made. Not sure if your parents will get it and might be a little alarmed that you crafted a weapon with your own artistic hands... but other artists & sci-fi nerds will appreciate it ;)
I hope you found this "tutorial" somewhat insightful/helpful, or just interesting to see another artist's workflow. Good luck and godspeed on your concept art journey! At least you'll have your weapon of choice with you ;).
😘⚡️🔫